Custom Modules in Drupal 8
Custom functionality doesn't need to take more time
Custom functionality doesn't need to take more time
Have you ever been in the situation where you had to create a custom module in Drupal to add some kind of custom functionality? This post will help you understand how we develop custom modules in our sites as well as how we believe you would want to theme them. We will first take a glance at some requirements you will need and how they will speed up your development process.
The most important piece of software I use to develop modules is Drupal Console (DC). Drupal Console is a Symfony-based command line interface (CLI) that is used to generate modules and custom functionality within modules. Drupal Console is installed globally on our machines and is a required library within our projects. On top of Drupal Console generating code for us, it also has commands to help debug. The main reason I use Drupal Console is to keep typos out of my code. If I don’t have to write the code for namespaces, then I won’t type something wrong, and that can be the difference between your code working or not.
Let’s jump into the main command that generates the module. One quick note on the images: I am executing the project-installed Drupal Console instead of the global-installed version to show another example of how you can execute Drupal Console commands.
One thing that I like to do before creating a module is understand how to reuse the functionality within this module and share it with other modules that will be created for the project. You also want to make sure that you are using a naming convention for each module. At ICF, we use JIRA for managing our tickets and JIRA will have a project key that each ticket name is prefaced with. I like using that to preface all of my modules specific to that project. For example, if our JIRA key is “ABC,” then I create my modules like so:
“ABC My Custom Module”
“ABC My Second Custom Module”
“ABC My Third Custom Module”
I’m not telling you that you have to do it the way I chose to do it. For example, you could choose your project’s name instead. The important thing here is to find a naming convention for all the modules within your project and stick to it. For now I will continue with using the JIRA key.
Now, when Drupal Console asks for a “package name,” I use “ABC.” I didn’t use this naming convention on my first project, and it still bothers me when I look at the modules page. Now you may ask, why use a naming convention at all? The answer is you don’t have to, but, if you did, it is a lot easier to remember what your function names are and the proper namespace to use functionality across those modules. For me, it’s more of an organizational thing.

This will take care of generating all the important files needed for your module to show up on your module extend page for you to enable it. If you look at the bottom of the previous image, you will see the three files that get generated by Drupal Console. Let’s view the contents of those files. Let’s start with the abc_my_custom_module.info.yml file.
1.	name: ABC My Custom Module
2.	type: module
3.	description: My Custom Module
4.	core: 8.x
5.	package: ABC
You now see the questions asked by Drupal Console that we used to gather the information needed to generate this file. Now let’s move onto the abc_my_custom_module.module file.
1.	<?php
2.
3.	/**
4.	 * @file
5.	 * Contains abc_my_custom_module.module..
6.	 */
7.
8.	use Drupal\Core\Routing\RouteMatchInterface;
9.
10.	/**
11.	 * Implements hook_help().
12.	 */
13.	function abc_my_custom_module_help($route_name, RouteMatchInterface $route_match) {
14.	  switch ($route_name) {
15.	    // Main module help for the abc_my_custom_module module.
16.	    case 'help.page.my_custom_module':
17.	      $output = '';
18.	      $output .= '<h3>' . t('About') . '</h3>';
19.	      $output .= '<p>' . t('My Custom Module') . '</p>';
20.	      return $output;
21.
22.	    default:
23.	  }
24.	}
This file is generated with the hook_help() function by default. By implementing this function, a module can make documentation available to the user for the module as a whole, or for specific pages. Help for developers should usually be provided via function header comments in the code or in special API example files.
The page-specific help information provided by this hook appears in the Help block (provided by the core Help module) if the block is displayed on that page. The module overview help information is displayed by the Help module. It can be accessed from the page at /admin/help or from the Extend page. If a module implements this, the help system expects module overview help to be provided.
For simplicity, let’s say that you have a ticket to implement a custom form in your site. If you have gotten the trend of this article so far, you will find that there is a Drupal Console command to do that for you. Let’s run that right now and elaborate on it.
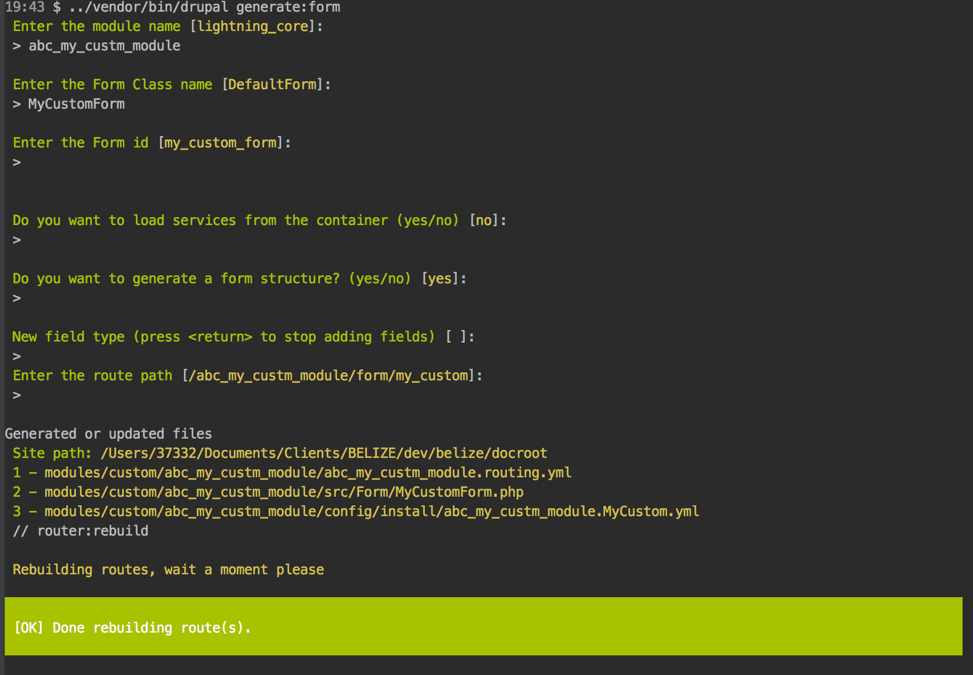
First, you are asked what module the form will be generated in. Then, it asks for the class name of your form. To finish it off, I take the defaults. You will notice that Drupal Console tells you that it rebuilds the routes after creating the form because Drupal needs to know that the new form exists. From the output above, you will see that it creates 3 new files, a routing file, your form file, and an install file. Let’s dive into those three files to explain what each one is doing for us.
modules/custom/abc_my_custm_module/abc_my_custm_module.routing.yml
1.	abc_my_custm_module.my_custom_form:
2.	  path: '/abc_my_custm_module/form/my_custom'
3.	  defaults:
4.	    _form: '\Drupal\abc_my_custm_module\Form\MyCustomForm'
5.	    _title: 'MyCustomForm'
6.	  requirements:
7.	    _access: 'TRUE'
This is Drupal’s standard- to add a route to its routing table. What this means is that you can now go to that path in your site to view the new form you just created. It has the defaults for the forms namespace and title as well, which is the basic information for Drupal to utilize the form. Now let’s look at our form class file.
modules/custom/abc_my_custm_module/src/Form/MyCustomForm.php
1.	<?php
2.
3.	namespace Drupal\abc_my_custm_module\Form;
4.
5.	use Drupal\Core\Form\FormBase;
6.	use Drupal\Core\Form\FormStateInterface;
7.
8.	/**
9.	 * Class MyCustomForm.
10.	 *
11.	 * @package Drupal\abc_my_custm_module\Form
12.	 */
13.	class MyCustomForm extends FormBase {
14.
15.
16.	  /**
17.	   * {@inheritdoc}
18.	   */
19.	  public function getFormId() {
20.	    return 'my_custom_form';
21.	  }
22.
23.	  /**
24.	   * {@inheritdoc}
25.	   */
26.	  public function buildForm(array $form, FormStateInterface $form_state) {
27.
28.	    $form['submit'] = [
29.	        '#type' => 'submit',
30.	        '#value' => t('Submit'),
31.	    ];
32.
33.	    return $form;
34.	  }
35.
36.	  /**
37.	    * {@inheritdoc}
38.	    */
39.	  public function validateForm(array &$form, FormStateInterface $form_state) {
40.	    parent::validateForm($form, $form_state);
41.	  }
42.
43.	  /**
44.	   * {@inheritdoc}
45.	   */
46.	  public function submitForm(array &$form, FormStateInterface $form_state) {
47.	    // Display result.
48.	    foreach ($form_state->getValues() as $key => $value) {
49.	        drupal_set_message($key . ': ' . $value);
50.	    }
51.
52.	  }
53.
54.	}
This is a pretty big file, so I will go over the important parts of it. This class file consists of all the functions to get the form’s id {getFormId()}, to build the form {buildForm}, to validate the form {validateForm()}, and to submit the form {submitForm()}.
Now let’s dig a little deeper into what we want to do with our form functions. Let’s start with building the form. Drupal Console has been kind enough to put in the submit button. Notice that they have chosen to use the new array syntax when defining the submit button. This syntax is new to PHP 5.4 and is not backwards compatible. Let’s add some code to this section to give us some more form fields. Note that you will find all available form elements that Drupal supports here. I could go into more depth on form building, but let’s just stick to creating an initial basic form.
1.	/**
2.	   * {@inheritdoc}
3.	   */
4.	  public function buildForm(array $form, FormStateInterface $form_state) {
5.
6.	    $form['username'] = [
7.	        '#type' => 'textfield',
8.	        '#title' => t('Username'),
9.	        '#required' => TRUE,
10.	    ];
11.	    $form['phone_number'] = [
12.	        '#type' => 'tel',
13.	        '#title' => t('Phone'),
14.	        '#required' => TRUE,
15.	    ];
16.	    $form['email'] = [
17.	        '#type' => 'email',
18.	        '#title' => t('Email'),
19.	        '#required' => TRUE,
20.	    ];
21.	    $form['submit'] = [
22.	        '#type' => 'submit',
23.	        '#value' => t('Submit'),
24.	    ];
25.
26.	    return $form;
27.	  }
The previous code will simply put three more form elements on the form: one for username, one for phone number, and one for email. One nicety of Drupal is that its form inputs use HTML5 syntax and will be validated using HTML5 first. Now let’s look at the last file generated by Drupal Console.
modules/custom/abc_my_custm_module/config/install/abc_my_custm_module.MyCustom.yml
1. abc_my_custm_module:
This file is used to define some defaults that your module could use. If we wanted to predefine a select list based on data we know will not change, we could define the data in that file, uninstall the module, and reinstall the module, then run the drush config-get command passing in abc_my_custom_module.myModule to verify that the config data exists.
drush config-get abc_my_custom_module.myModule
For example, if you add this to your function,
$config = \Drupal::config(‘abc_my_custom_module.myModule’);
it would return an array of those predefined values. Granted, in this particular case you could just hardcode that data, but it’s helpful if you needed to use that data in any other module that you create. You can access that same configuration data form within that module so you don’t have to duplicate your code.
Now let’s move onto form validation. You can leave that function as-is and add your validation to each form element from within the form class file. If you look here, you will find the “#element_validate” attribute that you can add to each input. This allows you to define a callback function to validate that input. This can be a global PHP function or one you write yourself. In the first module that I wrote, I chose not to use this attribute but to do all my custom validation inside the formValidate() function. Here is an example of my email validation.
1.	// Validating email with Drupal.
2.	    $email = $form_state->getValue('email');
3.	    if (!\Drupal::service('email.validator')->isValid($email)) {
4.	      $form_state->setErrorByName('email', t('The email address %mail is not valid.', array('%mail' => $email)));
5.	    }
What this did was get the value form the $form_state variable, and use Drupal’s built-in email validator service to validate the email. Another nice thing about this validation function is that you can bring in outside libraries like libphonenumber-for-php to validate a phone number based on a country code.
From here, there are a few different ways that you could take this module. For example, you could have the submit function just send an email of the form data to an admin. Another workflow would be to create a new user based on that content and possibly even create a node on the behalf of that new user. That was a similar workflow to my first module. The last thing you could do is create a schema file and save that form data into the database. For example, if you wanted to store the data for the email into the database in case you needed to go back and verify something in that data, you could. The possibilities on what you can do in a custom module are endless and there is one thing for sure that we know. Using Drupal Console greatly speeds up your development process.
The next step in this process is to theme your form. This is one area where I would love the time to contribute to Drupal Console and update the generation command to generate a default template and the hook_theme() function to define that template file for the form. Basically, there are a few steps that need to be done. You first need to create a template file in a folder named “templates,” that will reside inside your module directory. I prefer to name the template file after the module. If you are looking for a decent example to start with, I recommend reviewing the paragraphs module. For now, we will dive into functions you would want to add into your .module file and let’s use the paragraphs module file to explain what needs to happen. Two crucial new hooks you need are hook_theme() and hook_theme_suggestions_template().
1.	/**
2.	 * Implements hook_theme().
3.	 */
4.	function paragraphs_theme() {
5.	  return array(
6.	    'paragraph' => array(
7.	      'render element' => 'elements',
8.	    ),
9.	    'paragraphs_dropbutton_wrapper' => array(
10.	      'variables' => array('children' => NULL),
11.	    ),
12.	  );
13.	}
14.
15.	/**
16.	 * Implements hook_theme_suggestions_HOOK().
17.	 */
18.	function paragraphs_theme_suggestions_paragraph(array $variables) {
19.	  $suggestions = array();
20.	  $paragraph = $variables['elements']['#paragraph'];
21.	  $sanitized_view_mode = strtr($variables['elements']['#view_mode'], '.', '_');
22.
23.	  $suggestions[] = 'paragraph__' . $sanitized_view_mode;
24.	  $suggestions[] = 'paragraph__' . $paragraph->bundle();
25.	  $suggestions[] = 'paragraph__' . $paragraph->bundle() . '__' . $sanitized_view_mode;
26.
27.	  return $suggestions;
28.	}
When examining this, we find that the paragraphs module has a template file named paragraph.html.twig. In the hook_theme() function you will return an array of default data available to that template. The second function is used to define theme suggestions for our themers to override the look and feel of our form in their own template override file. This is crucial if your module is going to be used on multiple sites that need to theme that form differently. With that being said, you can use core files as a reference. I recommend reviewing what is needed inside those template files before you decide to tackle that part of it. Review Drupal’s api on hook_theme() function so you can build the template accordingly. To be honest, the first time I had to do this, the module was not going to be used in any other sites, so I themed up the form within that template file and did not add suggestions for theming. That way our themers would not get confused and think that they could create an override template for that page.
I know I covered a lot here, but if you can take anything away from this article it would be to use Drupal Console to speed up development, and if you need to create a module that has some functionality that will need to be overridden on a per-site basis. You should review as much documentation as possible and review existing Drupal 8 modules for reference material. I appreciate your comments and hope this was useful to advance your skills in developing custom modules inside Drupal 8.